Ready or not, here we go: the snow is flying and it’s time to shred! Just like you, your snowboard has been on summer vacation. It’s tempting to simply pull it out of the closet and strap in, but with just a little maintenance your ride will be exponentially better. Resist the urge to simply bring your stick into the local shop for a high dollar tune-up; you can achieve the same results at home for a small investment. It’s easy, smart, and rewarding when you DIY. Grab your board, Daniel Son, it’s time to WAX ON!

Preparation: Begin by taking your bindings off (if you already did that for summer storage purposes, good for you!). Use a damp cloth or towel to clean off any surface dust and dirt. Next, grab your scraper and strip off any wax still left on the base from last season. Don’t go crazy, use enough pressure to strip away the extra, but don’t gouge your base. After this step I like to use a base cleaner to remove any ground-in dirt and debris. Squirt the cleaner on and wipe it in with a clean paper towel. Now it’s time for edge detailing- a good edge tune ensures quality turns on early season hardpack, so unless you’re a park rat you will want a good, solid edge. Use a deburring stone to smooth down any major flaws, and finish the job with a couple passes from your edge tuning file. This is also the ideal time for any P-Tex work that needs to be done, but we’ll save that for another article. The prep work is done, let’s break out the wax.

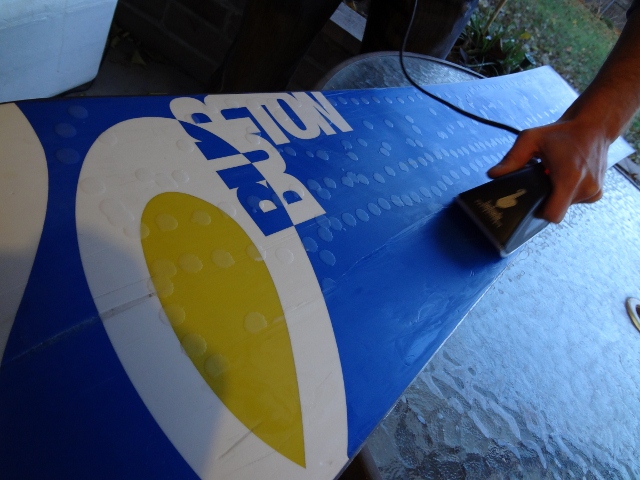
Waxing: Find a workspace with plenty of room and good ventilation. My backyard table does the trick for me. Plug in your iron and allow it to warm up to a high heat. Grab your favorite wax, press it against the iron and drip it onto the base. Your wax blobs should go from tip to tail in even rows; this will make the next step much easier. Once you’ve got good coverage it’s time to smooth it out. Press the iron onto your base and smooth the wax drippings out with fluid motions. Stay in one place just long enough to melt the wax; you don’t want to burn your base up. Once you have a nice, even coat it’s time to finish the job. Give your board a few hours to soak up the wax before entering phase 3.
Scaping/Finishing: Sure, you could skip this step and let the mountain be your wax scraper, but that’s for those lazy knuckledraggers out there. Instead, use your scraper to strip away all the excess wax (despite your best efforts in phase 2, wax always seems to build up somewhere on the base). The wax should come off in small, white shavings. If you want a true “shop wax” result, use a plastic brush to buff away any extra wax by applying medium pressure in small circles. Clean all the shavings off the base and behold your handiwork: you just saved yourself some cash and drives to the shop. Reattach you bindings and hit the mountains- you’ll be happy you waxed up when you’re dropping into the next kicker line.

Tools of the Trade: All the items referred to in the three phases can be assembled for a relatively cheap price. The key items to have in your kit are a sturdy plastic scraper, base cleaner, deburring stone, edge file, iron, finishing brush and a good bar of wax. You can find all of these at your local shop and hardware store, or you can purchase a kit that includes all of the basics for around $70. It may seem steep at first, but consider that most shops will charge $20-30 for this treatment, and they will keep your board for at least a full day. You should wax your board at least once a month (or more) during the season; do the math and it’s a no brainer: doing it yourself will save you some green and gasoline; two things that none of us seem to have a lot of these days.